

This lovely photograph and its accompanying blog post and recipe are from Gather & Dine. Follow the link to access many process photographs and directions.
But I didn’t discover this fabulous item via the G&D blog. Instead, perhaps 20 years ago I was in the big Safeway near our then-house in Northern Virginia. It was getting close to December, and they had that issue of their store magazine out for sale, with recipes showcasing their ingredients and many coupons. I was stopped dead by the illustration on the cover for something called a “biscotti tree.” Alas, I can’t find that image in my files, although I know I had it at one point. Suffice it to say that I was fired with enthusiasm for making it, and I try to do so every year. If it’s December, then I must be making Tiny Tim Cranberry Tarts and Almond-Orange Biscotti Trees!
Here’s the really interesting thing: I’ve only ever seen this recipe/assembly idea in that Safeway magazine and then on the food blog I’m referencing here. That blog’s author, Emily, gives credit for the idea to a website that no longer exists. So it’s just her and me! And it looks to me as though she stopped posting on her blog back in 2018, although her site has an up-to-date copyright notice. So soon it may just be me! I’d better step up my game.
Unfortunately the pictures that my husband took of my own trees did not come out, and I don’t make things just for photos. They got carted off to the Cherry Creek Chorale’s reception and eaten. So there won’t be any more of them until next year. I’ll try to record my own techniques at that time.
In the meantime, though, if your heart is somewhat failing you at the thought of making a gingerbread house, perhaps you can substitute this item instead. The recipe from Gather & Dine is actually pretty healthful, with its use of whole-grain flours and relatively low sugar content. My recipe is exactly the same except that I’ve always used regular old white flour, and her specification of “natural cane sugar” is completely unnecessary. Sugar is sugar; just use granulated sugar. But in spite of those caveats, you can certainly believe that I’m going to save her recipe and use it next year. (Although I also won’t bother with the distinction she makes between whole wheat flour and pastry flour. Oh, and yet another change, the last one, I think she has you make way too much icing. Half of that will be plenty.) Let’s face it: nobody really wants to eat a gingerbread house. (Just as nobody really wants to eat a slice of wedding cake with gooey frosting and that disgusting fondant stuff. Oops! Just ignore that comment.) But people love biscotti, and I think these are particularly good.The icing gives them just the right touch of added sweetness. G&D also has a second version, this one an espresso-chocolate-pecan one, that also sounds fabulous. Next year I may make one of each.
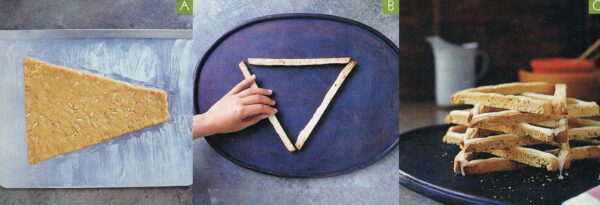
Here are the only images I have from that Safeway magazine of long ago–please note that I fiddled with the measurements a little bit to make the biscotti a bit thicker and sturdier.
If you’d like the rather plain-Jane version I have in my files, here it is:
Tiered Biscotti Tree
Constructed from baked biscotti dough glued together with icing, this cookie tree is an edible centerpiece. Put it out for a party and let guests munch their way down, lifting it apart branch by branch. The cookies make good dunkers for coffee.
Biscotti:
1 1/2 cups slivered almonds
3/4 cup (1 1/2 sticks) butter, at room temperature
1 cup sugar
1 tablespoon grated orange peel or 1/8 tsp. orange oil
4 large eggs
1 teaspoon vanilla
4 1/2 cups all-purpose flour
4 1/2 teaspoons baking powder
1/2 teaspoon salt
1/2 teaspoon ground cinnamon
1/4 teaspoon each ground cloves and ground nutmeg
Orange icing:
2 cups powdered sugar, sifted
2-3 tablespoons milk or orange juice (The milk gives you a nice white icing, but the orange juice gives you more flavor. Take your pick!)
¼ tsp. almond extract
A couple drops of orange oil (If you used milk but want an orange flavor)—orange zest will interfere with the smoothness of the icing.
Mix until smooth, starting with only 2 tablespoons liquid and adding more if needed. It needs to be thick enough to hold its shape. If you need more icing you can easily mix up another 1/2 recipe.
Directions:
Place almonds in an 8- to 9-inch-wide pan. Bake in a 350o oven, shaking often, until golden, about 15 minutes; let cool.
In a large bowl, beat butter, sugar, and orange peel until fluffy. Add eggs, 1 at a time, beating well after each addition. Stir in vanilla. Combine 4 1/2 cups flour, baking powder, salt, cinnamon, cloves, coriander, nutmeg, and nuts; add to butter mixture and stir to blend thoroughly.
Divide dough into 3 equal pieces and cut 3 pieces of parchment paper to fit onto a baking sheet. Draw a 2″ x 10″ x 9″ triangle on the back of each piece of parchment and use that outline as your guide to shape each piece of dough. It’s not a bad idea to use a ruler or other straightedge to neaten up the edges. Bake in a 350o oven for 15 minutes or until light golden brown on top; triangles can wait for oven space if you don’t have enough to do all three at once.
Remove from oven, transfer via the paper to a large cutting board, and immediately cut crosswise into slices exactly 5/8-inch wide using a long and preferably serrated knife. (I use my bread knife.) It’s important to get the thickness the same for each batch, as otherwise your tree won’t be straight. It’ll still taste good, though. Put slices back onto the baking sheet(s), with one cut side up. Bake until golden brown on each cut side, about 20 minutes, turning cookies over once while baking. Cool on racks. If making ahead, package airtight up to a day, or freeze.
To build the tree, pipe (use a 1/4-inch tip) or spread a little frosting on 1 side of each of the longest cookies. Lay icing-side down on a flat platter, tips touching, to form a triangle. Pipe or spread icing down center of each cookie on plate. Stack the 3 next-longest cookies on the first, inverting position of the triangle (see step 3). Build tree, using the next-smallest cookie trio for each level and cementing with icing. If you like pipe icing to drip over the edge of the cookies. You can add whatever decorative elements you’d like. Silver dragees are nice as they look like little ornaments.
I’d make every effort to assemble the tree the same day you serve it. If it sits too long the cookies may start absorbing moisture from the icing.